DigitalSign Technical Help
DigitalSign is pleased to inform you that it has successfully concluded with the National Security Office (GNS) the accreditation of new Certificate Authorities for the issue of Qualified Digital Certificates, using the latest cryptographic algorithms, including ‘Elytical Curves’ technology.
These new CAs have been published since 03/25/2021 in the EU Trust List (EU List of eIDAS Trusted Lists – LOTL) –consult here.
To install, download the installer from the certification chain in the followinglink.
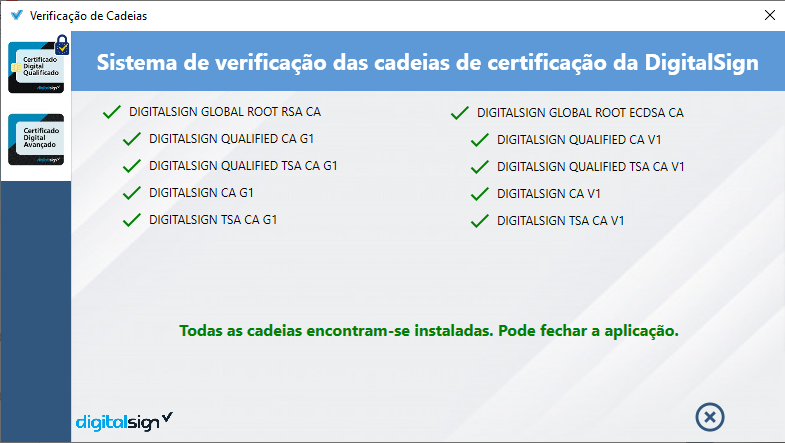
https://qca-v1.digitalsign.pt/DIGITALSIGNQUALIFIEDCAV1.p7bIf you wish to install manually, the certification chains for the new AC’s are as follows:
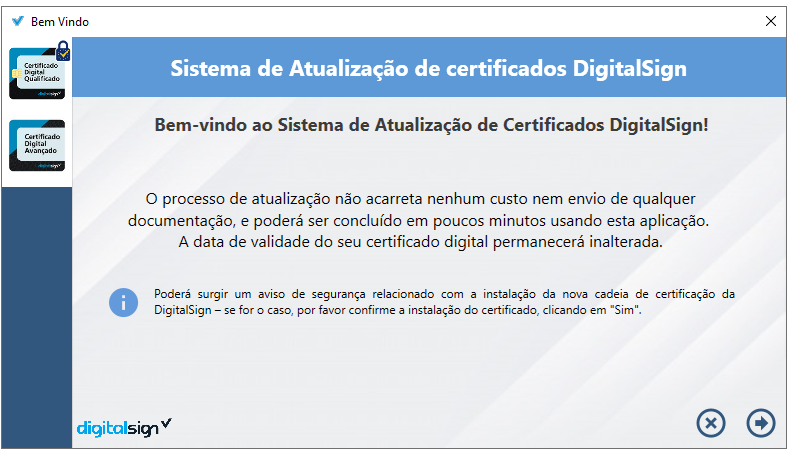
Since DigitalSign has successfully completed the certification of a new Root Certificate Authority (ROOT CA), it is therefore necessary to update its certificate issued in the old CA in order to ensure that it will continueVALID.
In this sense, DigitalSign provides a certificate updater for this process to be carried out in a simple and quick manner.
To update certificates issued on physical device (Smartcard, Token), download the updater following the steps described below and follow the illustrative video.
To carry out the issue of yourAdvanced Digital Certificateyou need to install the application‘Certificate Emission Service Advanced’and use the details given in point 3 of the email received with the information that the certificate is ready to lift.
1. Download the application available on the followinglink. If the download does not start automatically, please try downloading from another browser.
2. After installation, open the application and fill in the data received by email with the order details. Then click on"Validate"
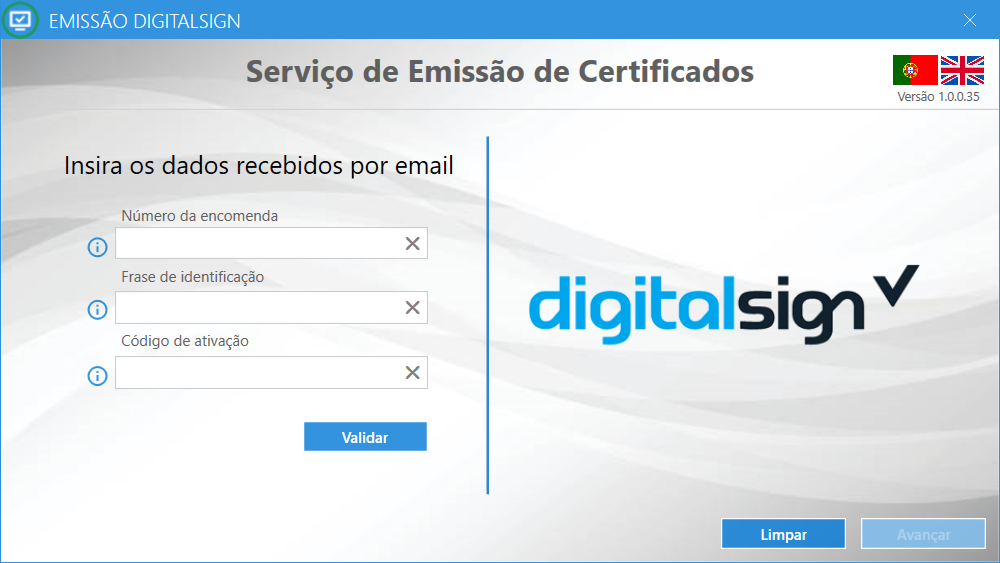
3. Complete the validation of your email via the email request sent byDigicert.

4. Follow the instructions in the application to complete the installation of your Advanced Digital Certificate.

If you have completed the entire documental process and have made the payment and have not yet received the certificate removal email, please contact the Customer Support line:
Tel.: +351 253 560 642
Email: suporte@digitalsign.pt
You must resume removal and/or installation at the same place where you started it. Run the application again by entering the order details and the process will resume at the step where the issue was suspended.
Please contact the Customer Support line:
Tel.: +351 253 560 642
Email: suporte@digitalsign.pt
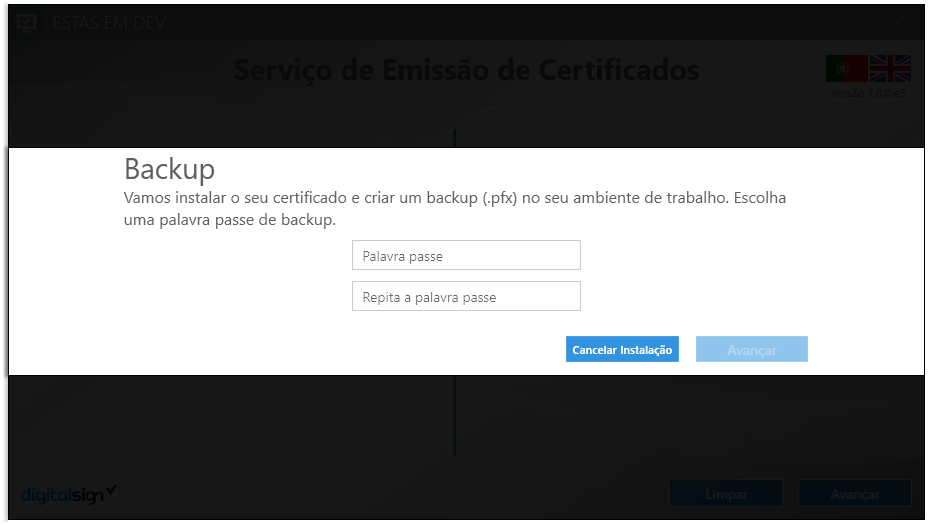
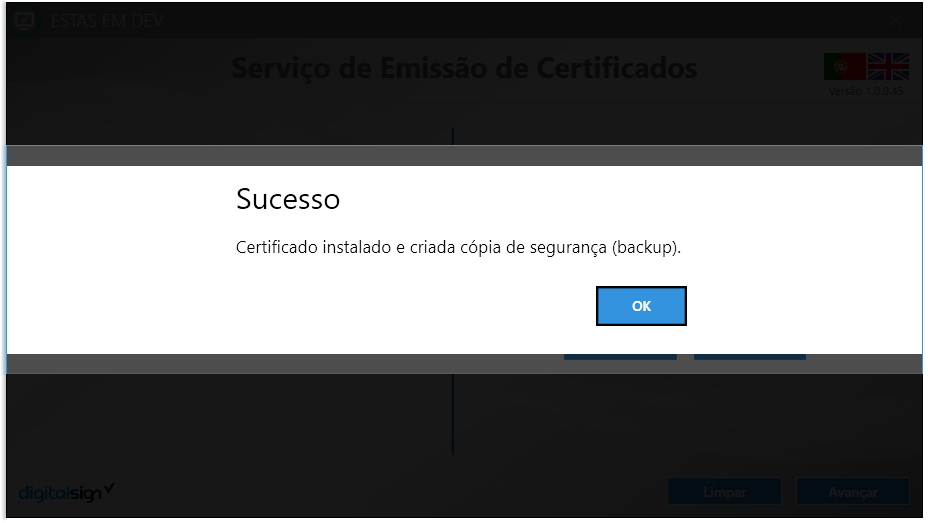
A backup copy of the certificate (called backup is a file in the format ‘.pfx’) is automatically placed on the desktop/work environment of the computer in question – it has the descriptionDigital«Order». pfx.
Please refer to the instructions in thismanual.
DigitalSign being a qualified provider of trusted services (see Trusted List published by the Supervisory Entity – National Security Office –on the European Commission website– and being aware of the difficulties in using electronic signatures using smartcard or token cards, implemented the IDcert service that aims to create the certificate and its use in a completely remote and centralized way in its secure datacenters.
For applications (such as Microsoft Word, Adobe Acrobat, Sign&Go and others) or platforms that have not integrated the feature for direct access to the remote certificate (such as AcinGov, AnoGov and others), you will need to install the middleware – VirtualCSP – necessary to ensure integration.
Download middlewareHere.(VirtualCSP) and then proceed to installation as instructedHere..
Note:
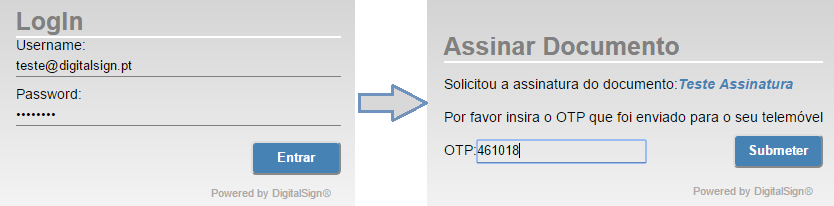
When integrated with our partners, you do not need to install any software. The signing process is extremely simple – you only need your credentials (email + password). The signature approval method depends on what you have defined.
OTP code– You will receive a confirmation SMS message or enter the code of a registered authenticator.
DS Wallet can be used for authentication or authorisation, using digital credentials. These credentials, issued at the time of identity validation or certificate issue, are stored in DS Wallet and allow you to prove your identity quickly and safely, sharing only strictly necessary information.
In this way, you can approve digital signatures via Ds Wallet without the need to use OTP codes or other authorisation mechanisms.
Use with VirtualCSP:
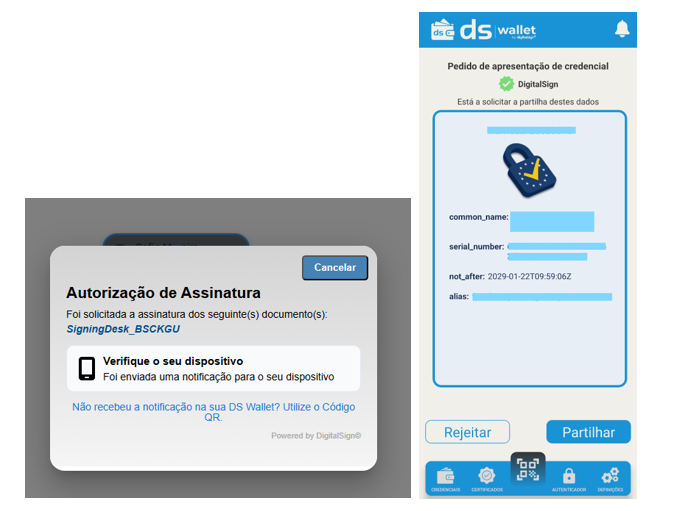
1. By creating the signature in the chosen application (in the example below Microsoft Word was used), you will be sent a notification to your DS Wallet to approve the subscription.
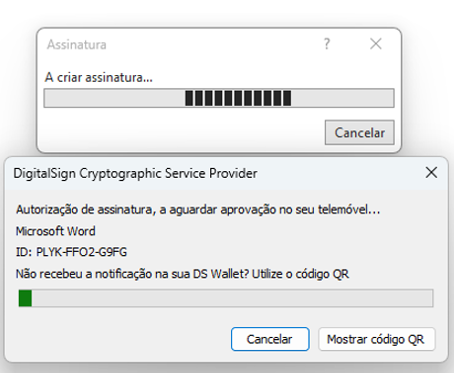
2. Click on the notification received on your device or access notifications in DS Wallet. Approves the signature application by submitting the respective credentials so that the signature is approved successfully.
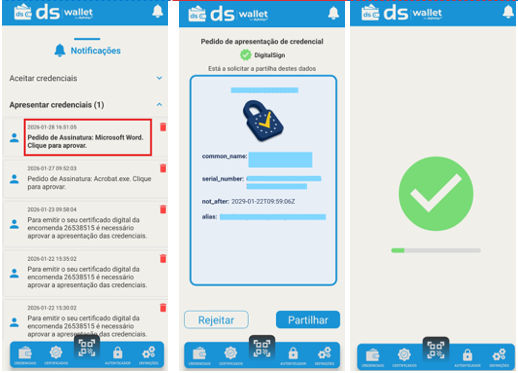
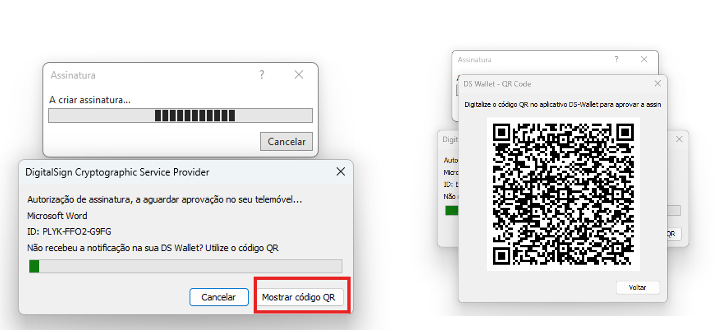
3. If you are in difficulty receiving the notification, you can read the QR code with DS Wallet so that you are asked to submit your credentials, as set out in point 2.
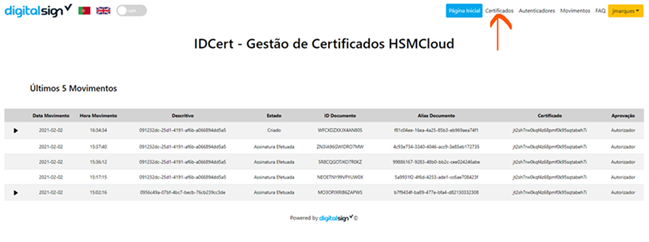
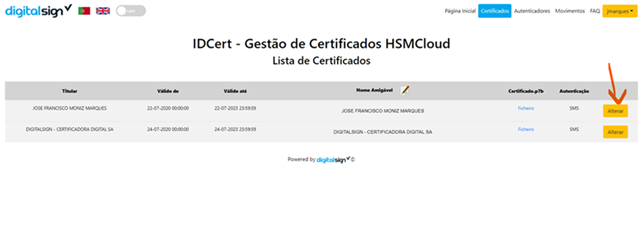
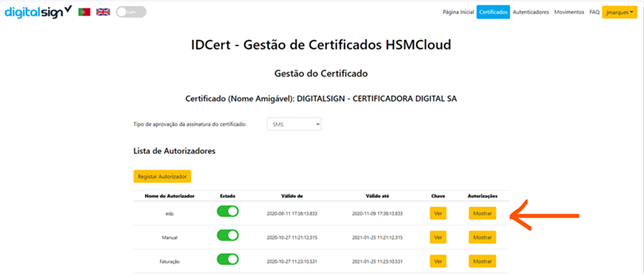
How do I log an authenticator?
To see authorizations for an Authorizer, click the button"Show"
Note 1:Each authorization associated with an Authorizer has one60-day validity– you must renew before your expiration date to allow subscription to applications.
Note 2: It is possible to configure more than one Authorizer for use in compatible applications, such as electronic billing platforms.
Note 3:Register Authors is only allowed in qualified digital certificates with profileElectronic seal.
How can I renew the authorisation granted to an Authorizer?
3. Select the Author you want to renew and click the button"Show"
4. The list of authorisations already granted to this Authorizer is shown. Click the button"Renew"
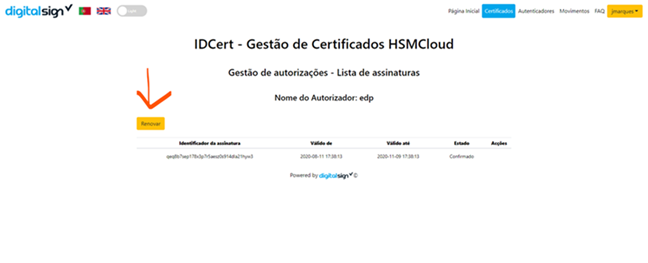
5. Complete the process by entering the OTP code received by SMS/Email (sent to: mobile phone/mail number) associated with the certificate.
What is the difference between an Authorizer and an Authenticator?
An Authorizer is registered by the client and used by partners the customer trusts to generate signature codes. These are included in the subscription applications made by the partners on behalf of the client as a method for approving the subscription. This type of signature code generator is mostly used in contexts of integration with electronic billing platforms, among others. In this same context, the client registers Authorizers, and allows the partner(s) to use them for document signing purposes. Each Author is associated with a specific certificate. This means that the signature codes generated by a given Authorizer only approve the signature of documents with the certificate associated with the same Authorizer.
A Authenticator is registered by the client, and the subscription codes generated by it can be directly found in a mobile app developed by DigitalSign called DSAUTH available for iOS (App Store) and Android (Play Store). These signature codes are used by the client to approve signatures in the context of a subscription process entirely carried out by the customer. In this same context, only the customer has access to the Authenticator and its respective generated codes.
The main advantage that comes from the use of Authenticators is to be able to quickly consult the signature code on the mobile app, rather than waiting for the SMS to be received on the mobile phone to obtain the signature code.
The signature codes generated by registered Authenticators approve the signature of documents in which certificates with defined type of approval to the Authenticator are used.
SafeSign Standard (SafeSign IC) is an innovative Software developed exclusively for DigitalSign customers in order to simplify the use of digital certificates issued by DigitalSign Certificate Authorities.
Check with a DigitalSign Consumer Service (SAC) operator, what options are available for your good use of the Software with your cryptographic device (Card or Token).
WARNING: At no time import or export certificates to your cryptographic device as it may damage your certificate.
Whenever a new certificate is required due to misuse of the Software, DigitalSign will not be held responsible. It is necessary to issue a new certificate and a new documentary validation.
Any questions about our Software, please contact one of our specialized operators.
The cryptographic device containing your digital certificate is of personal and intransmitable use. Remember, your certificate is your identity in the virtual world! Do not provide others with your card or token containing your certificate, or provide access passwords (PIN and PUK), as they are unique for use with your certificate.
WARNING: By providing your certificate together with your access passwords (PIN and PUK), your holder may, for example, create legal documents on your behalf, among others.
The cryptographic device should only be used when performing a digital signature. The digital certificate replaces its handwritten signature as such identifying the person holding it.
In case of loss or loss of the device, report to DigitalSign as soon as possible so that we can revoke it. The revocation action shall be taken by the holder of the revocation. After revocation, your certificate will no longer be valid and you will therefore need to purchase another certificate.
Take care of your device that contains your certificate, do not fold it, do not damage the chip, exposing it to heat or water, if your device does not work for misuse, your certificate will be disabled.
DigitalSign is not responsible for incorrect use of the certificate and mismanagement of the cryptographic device.
If in doubt contact DigitalSign Support Operator, who will help you in the best way possible.
CSR (Certificate Signing Request) is an encrypted file containing the company's public key, location and URL (Web address).
To create a CSR, you have to use the web server software. When generating CSR, the Web server creates two files: a private key and CSR.
CSR is required when the client requests a Server Certificate. The CSR will have to be sent to us along with the Server Certificate request.
Before starting the application for an SSL certificate, you should ensure that you already have the CSR.
When generating CSR, most server software requests the following information: common name (e.g. www.example.com), name and location of the organization (country, state/province, city/town), key type (usually RSA), and key size (minimum 2048 bit).
Below you will find the instructions for the main servers. For other servers see thishelp.
CSR Generator:DigiCert Certificate Utility
Instructions:IIS 10 | IIS 8.5 | IIS 7 | IIS 5/6 | IIS 4 | PFX Import/export
CSR Generator:CSR for Exchange 2007 | DigiCert Certificate Utility
Instructions:Exchange 2016 | Exchange 2013| Exchange 2010 | Exchange 2007 | PFX Import/export
CSR Generator:Open SSL CSR Wizard
Instructions:Apache Server | Ubuntu Server with Apache2 | PFX Import/export
CSR Generator:Java Keytool CSR Wizard
Instructions:Tomcat Server | Java Based Server
CSR Generator:DigiCert Certificate Utility
Visually the CSR is text that starts with a line containing: ‘—–BEGIN CERTIFICATE REQUEST—–‘ and ends the last line with: ‘—–END CERTIFICATE REQUEST—–‘.
Example:
-----BEGIN CERTIFICATE REQUEST----
MIICxDCCAawCAQAwfzELMakGA1UEBhMCYnIxEjAQBgNVBAcMCVNhbyBQYXVsbzI
MCwGA1UECgwlRELHSVRBTFNJR04gQ0VSVElGSUNBQ0FPYERJR0lUQUwgTFREQTES
MCOGA1UEawwjd3d3LmRpZ2l0YWxzaWduY2VydGlmaWNhZG9yYS5jb20uYnIwggEi
MA0GCSqGSIb3DQEBAQUAA4IBDwAwggEKAoIBAQDKLAtrzhVU8tuBKURRRDeL4el5
0V4NywfGuyDHly6UW6BbLbVEYTCBJiaMOKOkZBybv32u0cLItAd5kfDxy7H7s1m7
nPcYRCAzNhKWQLaN8WQ8FhbRJmwuUwRvnyLcQp+wrl4H082vInJLSme8nx9XiNt
H3t0gWOE0UrYKDEeK8/kAU6aurt4tJrSdhcfwYdv6Kd12/7BUU61Ha6ZokBkiH+G
mPZK9cCmux3BVIAHODyAJ8GzyfEh7irN7i123qTjhLcUBqw7+TWZ9i53qA1uNXZ0
SR5yIj3DCyJ1VSZ6MGKJ+HsyoBdK20omgnxV58ooSEY1yJpCAKWMWhXkFihfAgMB
AAGgADANBgkqhkiG9w0BAQUFAAOCAQEAmziDYcPPOvxF5fi27O8jtLNiy+Ef3+5Y
dzjyuj6KAxrp37p3T7174o+55w3DZ8dYP3Gpn+QaVwoTma/ZWaN7nE4F596iBs4m
+u/VKgTGtKzP+3CM6eVyNjiQSh0ozjrVWjLLKxvDnuLm5O203HFc8WUVwncWFmOC
KsLiHWfk6Zqc9e8xEksu0a+rVdTYatOcRGyTmxwzW1+gB9J/0TMxkvRrywIcybf
P5xjXw3Tw4b9KS2cvSof1qHmOby+dyRmGBZf46gUFHviPGaRNyTXs9nhVBiQFx+A
PdzCw+IF/RsivOa+Qdlr/SS7QqGcdCzYjy120DAEqwKQkre c5f52oQ==
-----END CERTIFICATE REQUEST----
For the online validation of your identity, you need your identification document, in particularID card or passport.
Seein this listthe identification documents accepted by country/nationality to carry out the identity validation process.
Note that:
Install the ‘IDCheck’ app directly from the APP Store or Google Play.


In the application enter the access code and start identification.
TeamViewer is the tool used by DigitalSign to provide technical support. Download the Teamviewer app and run it when requested provide the ID and password to our Customer Support team.
Qualified Digital Certificate – Installation of the Certification Chain (Old):
Digital Certificate Export Advanced:
In the event of a consumer dispute, the consumer may use the following alternative consumer dispute resolution body:
Arbitration Center for Ave Valley/Arbitral Court – Guimarães
E-mail: triave@gmail.com
Telephone contact: 253 422 410
Website:www.triave.pt
For updates and more information, see the Consumer Portal atwww.consumer.pt(under Article 18 of Law No 144/2015 of 8 September)
Simple. Safe. Legal.


